


For this tutorial I used Adobe Illustrator, Adobe Photoshop and Cinema 4D. Pretty much all the light effects and composition are done in Photoshop, the other apps were used just to create some shapes and elements.
Step 1
The first thing to do is find or create the logotype of Tron Legacy. I found a vector file online with it. Then open it in Illustrator and convert the strokes to fill (Object>Path>Outline Stroke). Export the file in a very low version of Illustrator, I'm using Illustrator 8.
Step 1
The first thing to do is find or create the logotype of Tron Legacy. I found a vector file online with it. Then open it in Illustrator and convert the strokes to fill (Object>Path>Outline Stroke). Export the file in a very low version of Illustrator, I'm using Illustrator 8.

Step 2
Once you have the vector logo it's time to create the 3D version of it. We could use Photoshop Repoussé to create that but I decided to do it in Cinema 4D because I've been practicing more with it. So once you import the shape just apply a basic extrusion.

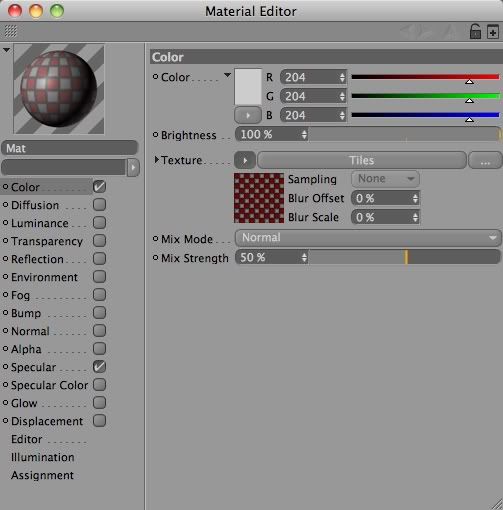
Step 3
One thing that was really cool with the Tron Legacy logo was that sort of digital pattern it has in the light effect, so to create that I used a simple Tiles texture for my material, that is a default preset in Cinema 4D. The color is not important because we will change that in Photoshop later on.
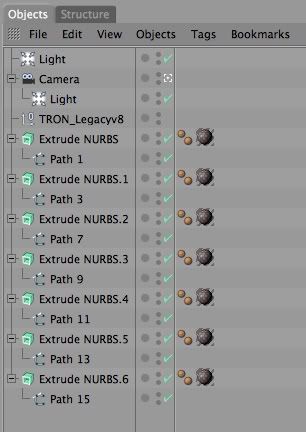
Step 4
Here is the Objects I have in Cinema 4D, as you can see there is all the shapes with the Extrude NURBS and the material. I also added 2 lights and a camera to get the right perspective.
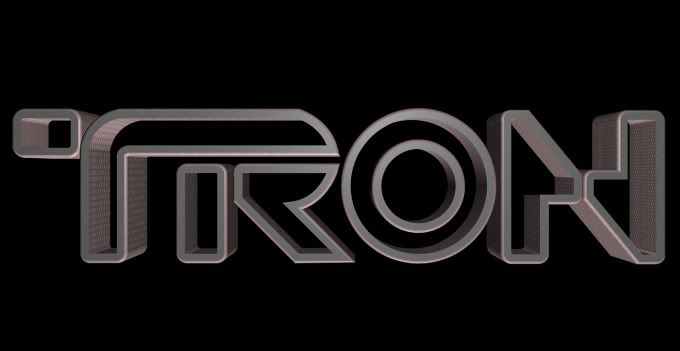
Step 5
Here is the final render in Cinema 4d.
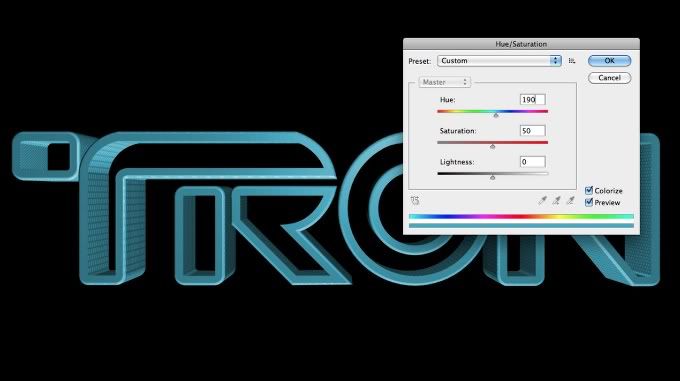
Step 6
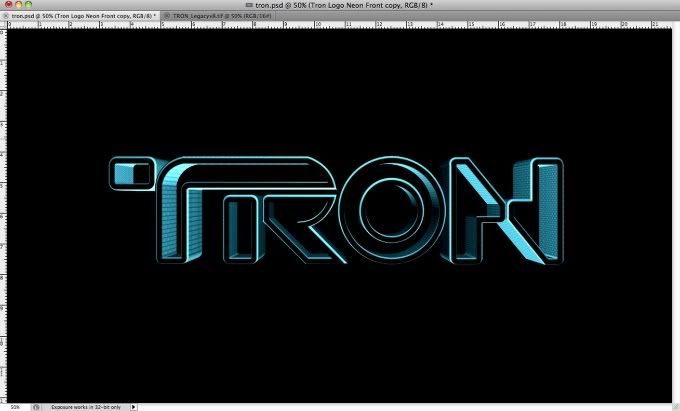
Open the logo in Photoshop and now let's start editing and creating the light effects. The first thing to do is change the Hue and Saturation. Go to Image>Adjustments>Hue and Saturation. Use 190 for the Hue, 50 for the Saturation and 0 for the Lightness.
Step 7
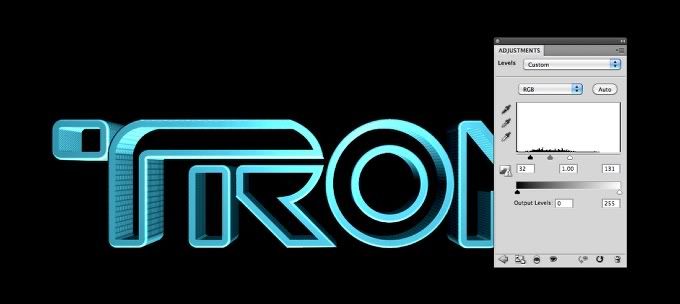
Go to Image>Adjustment>Levels. Change the black input to 30, the grey input to 1 and the white input to 131.
Step 8
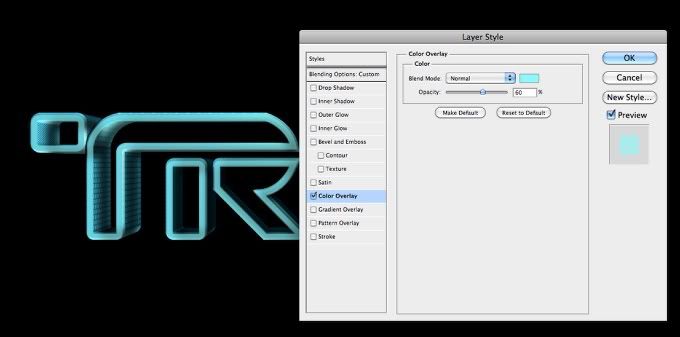
Import the vector logo and make sure it's black, you can add a color overlay through Layer>Layer Style>Color Overlay.
Step 9
Go to Edit>Transform>Scale, reduce the size so it's a size between the front and the back faces.

Step 10
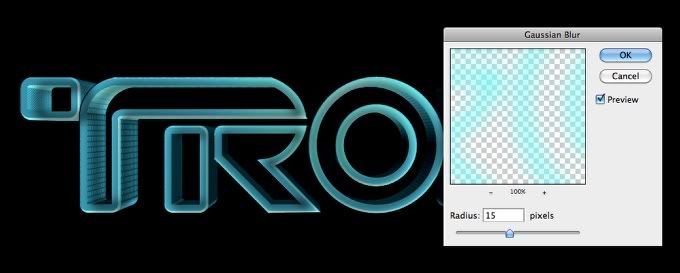
Go to Filter>Blur>Gaussian Blur. Use 15 pixels for the Radius.
Step 11
Duplicate the layer in order to make this dark effect darker.
Step 12
Import the vector logo again and position it in front of the 3D logo, this will be the neon effect.
Step 13
Go to Layer>Layer Style>Color Overlay. Use #86f7fe for the color with 60% Opacity. Also over the Blending Options, reduce the Fill color to 0%.
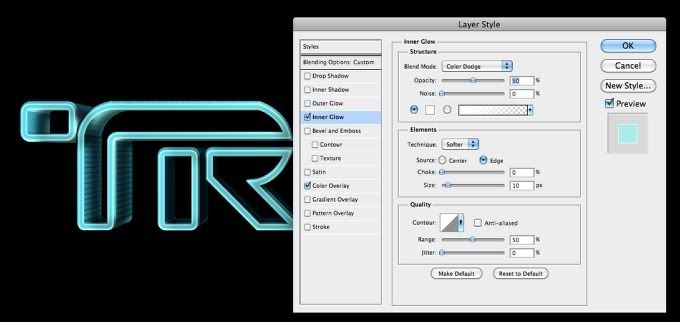
Step 14
After that select Inner Glow. Use Color Dodge for the Blend Mode at 50% Opacity. For the color use white. Change the Source to Edge and use 0% for the Choke and 10 pixels for the Size.
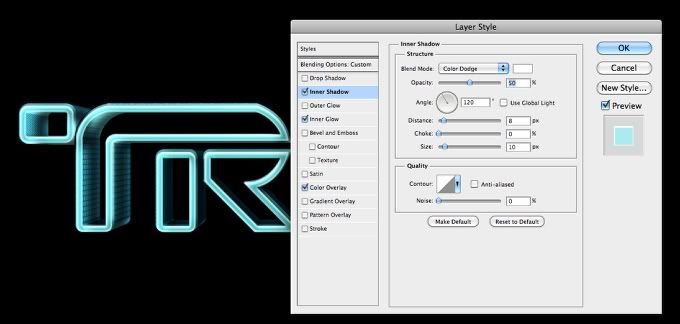
Step 15
Select Inner Shadow. Use Color Dodge for the Blend Mode with White for the color at 50%. Use 120º for the Angle, 8 pixels for the Distance, 0% for the Choke and 10 pixels for the Size.
Step 16
Now, select Drop Shadow. Use Screen for the Blend Mode with white for the color at 50%. For the Distance use 0, for the Spread 15% and for the Size 30 pixels.
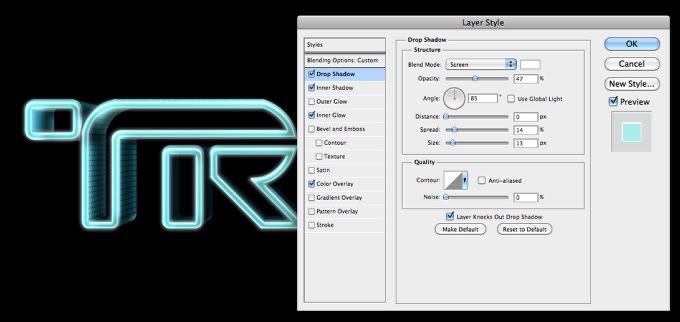
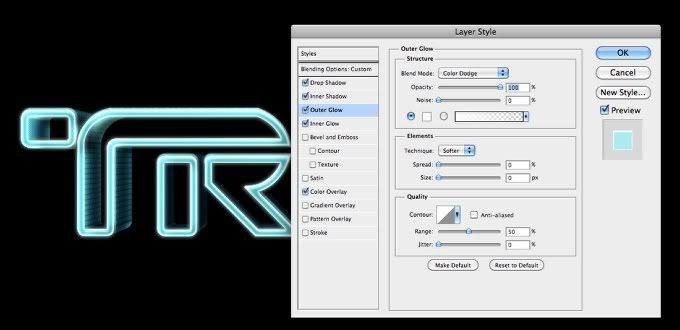
Step 17
The last option will be Outer Glow. Use Color Dodge for the Blend Mode, 100% for the Opacity, white for the Color. Them for the Spread and Size use 0.
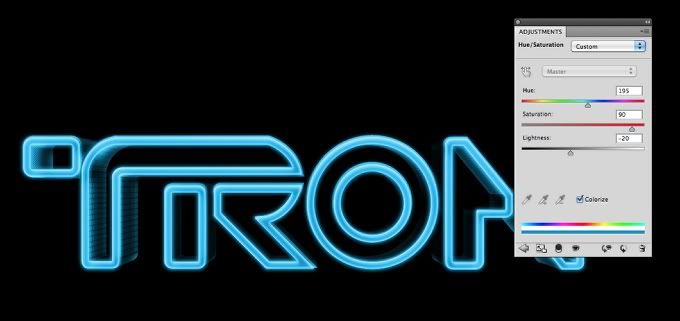
Step 18
Now go to Layer>New Adjustment Layer>Hue and Saturation. Use 195 for the Hue, 90 for the Saturation, -20 for the Lightness.
Step 19
Select all layers including the background and duplicate them, after that merge all the duplicated layers into a new one and go to Filter>Blur>Gaussian Blur. Use 10 pixels for the radius.

Step 20
Change the Blend Mode of the blurry layer to Screen at 80% Opacity.

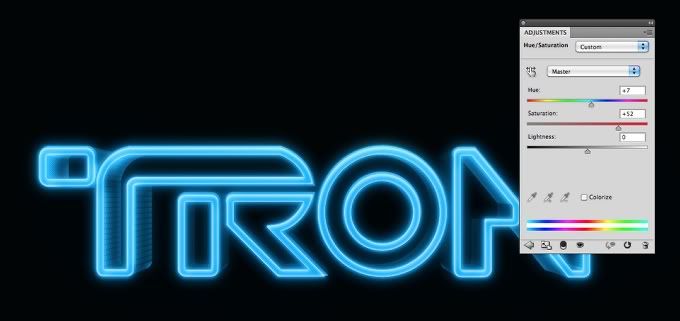
Step 21
Again go to Layer>New Adjustment Layer>Hue and Saturation. Use 7 for the Hue, 50 for the Saturation and 0 for the Lightness.
Step 22
Again select all the layers and duplicate them, after that merge the duplicated layers into just one. You can do that using the keyboard shortcut Command (MAC)/ Control (PC) + Alt + Shift + E. After that just change the Blend Mode to Screen at 50% Opacity.

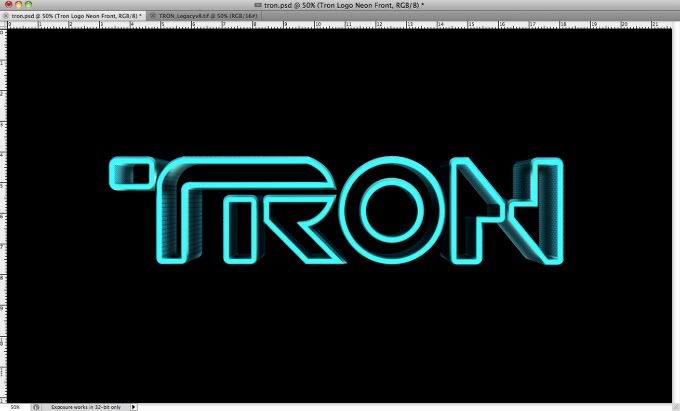
Step 23
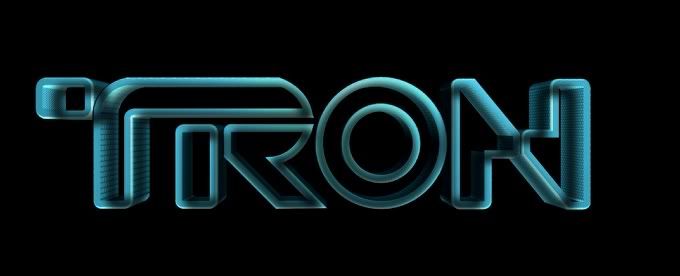
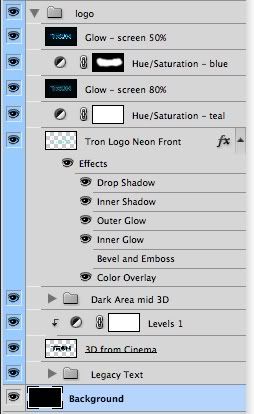
The Tron logo is pretty much done, as you can see we were able to create the nice 3D/light efect as we see in the trailer and we used basically Blend Modes and Adjustment Layers. For the Legacy text I used Helvetica Neue Ultra Light with a nice teal glow. You can save your file and end the tutorial here, but I want to show you how I created the whole composition. You can group all these layers and name the folder logo. Also you can duplicate the group and merge it into a layer so we will use only that file in the end of the tutorial. As it has a black background, change its Blend Mode to Screen as well, then hide it.

Layer Order
This is the layers order. You can see that it's quite simple.
Step 25
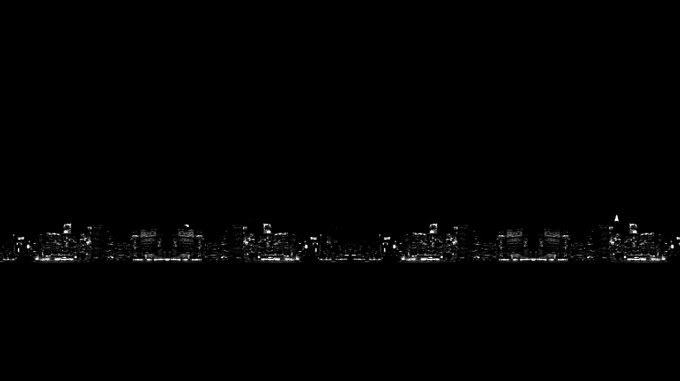
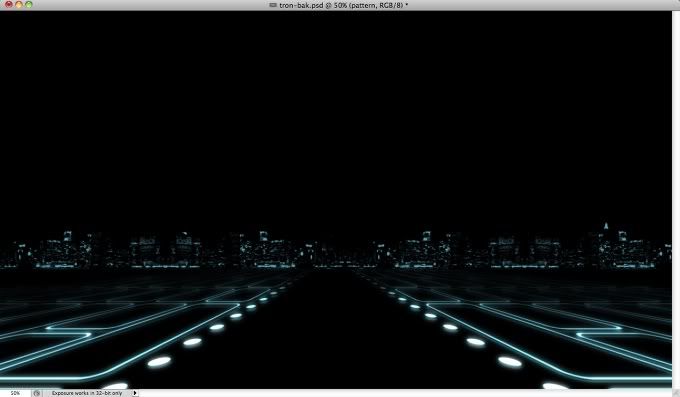
To create the composition like we see in the posters and in the trailer the first thing we will need is a city skyline photo to use in the background. The one I used is from Shutterstock and you can find it here http://www.shutterstock.com/pic-66610090/stock-photo-new-york-cityscape.html. So basically just desaturate the image (Image>Adjustment>Desaturate) and then go to Image>Adjustments>Levels and increase the black inputs and the white inputs. After that go to Filter>Blur>Gaussian Blur and use something around 10-20 pixels for the Radius. The idea is make it very blurry.
Step 26
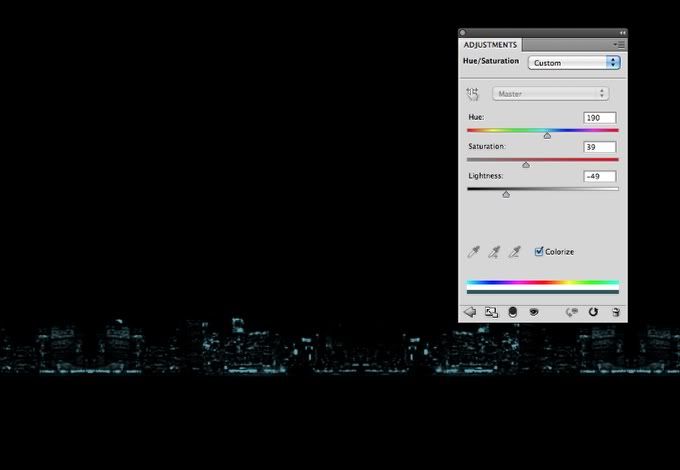
Now go to Layer>New Adjustment Layer>Hue and Saturation. Use 190 for the Hue, 40 for the Saturation and -50 for the Lightness. Also select the Colorize option. This adjustment layer will give that teal color to the image.
Step 27
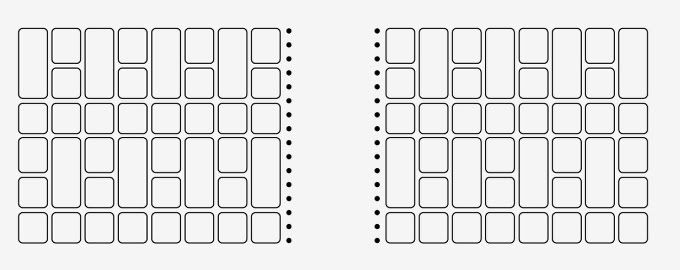
Back to Illustrator create a few rounded rectangles using the Rounded Rectangle Tool. Also create a few circles and an empty space where it will be the sort of highaway crossing the grid.
Step 28
Copy the shapes in Illustrator and paste that in Photoshop, below the the Adjustment Layer. Also make sure the vectors are white so you will make them teal. Once you paste the grid from Illustrator, go to Edit>Transform>Distort. Distort the layer to get the perspective like the image below.

Step 29
Go to Filter>Blur>Guassian Blur. Use 5 pixels for the Radius.

Step 30
Duplicate this layer and move it down a few pixels and then change the Opacity to 20%. That will create the reflection in the grid.
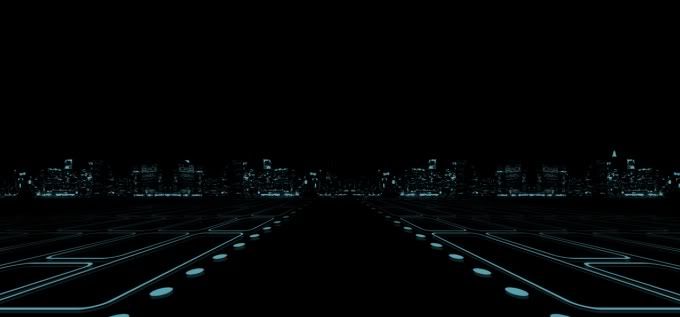
Step 31
Duplicate the grid layer again and move it above the Adjustment Layer. Group this copy into a folder and change the folder's Blend Mode to Color Dodge. After that select the layer inside the folder and go to Filter>Blur>Gaussian Blur. Use 10-15 pixels for the radius. That will depend on the shapes you created.
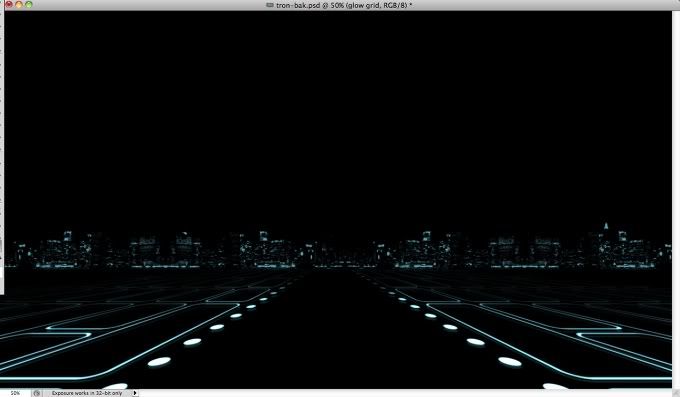
Step 32
Hide the city skyline layer and then select all the layers and duplicate them, after that merge all the duplicated layers into one layer only then go to Filter>Blur>Gaussian Blur. Use 10 pixels for the Radius.
Step 33
Change the Blend Mode of that layer to Screen at 100% Opacity. Also make the city skyline layer visible again.

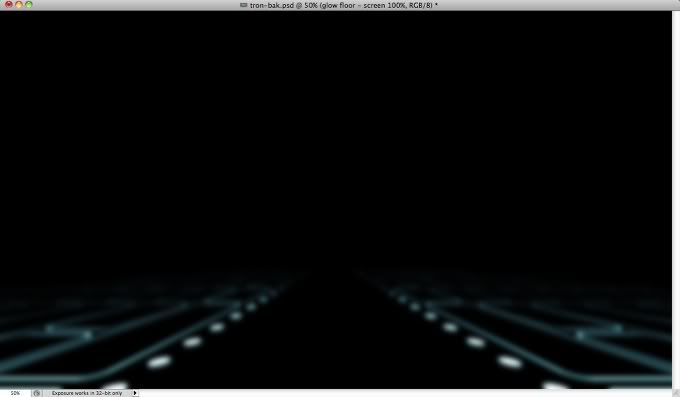
Step 34
Add a layer on top of the others and with the Paint Bucket Tool (G), change the type to Pattern and fill this layer with a scanline pattern. To create this scanline pattern is pretty easy. Just create a new document of 100x4 pixels and then create a rectangle of 100x2 in black. Also make sure that the background is white. Merge all layers and then go to Edit>Define Pattern. Just name it and that is it. With the Eraser Tool (E) delete the pattern area that is above the city skyline, the idea is that the effect will be visible only in the grid and city.

Step 35
Change the Blend Mode of the Pattern to Overlay at 15%.
Conclusion
Now make the Tron logo layer visible again and position it in the center of the composition. After that add a new layer and go to Filter>Render>Render Clouds. Make sure you had black and white for the colors. Then change the Blend Mode to Screen and the Opacity to 40%. With the Eraser Tool (E) you can delete pretty much all the areas close to the edges leaving only the area that is behind the logo and a bit on top of it. You can also add the same pattern overlay effect over the Legacy text to give that nice digital touch. Once again everything we did was done using simple tools and techniques mixed together, the most difficult part is understand and organize the thoughts, the software part is all about trial and error. So now it's up to you.
Source : Link


0 komentar:
Posting Komentar
Banyak tanya Banyak bingung banyak bata.. :D